Breaking
Ground.
Part 2 is where this Mac gets defended. Everything you build from Part 3 onwards lives on it, so the machine itself is made ready before any of that arrives.
By the end of Part 2: the protections already on your Mac have been checked one at a time, with a verdict written beside each, instead of anyone assuming they are switched on.
Three more are added on top of them. Pages known to carry scams and malware stop opening, every connection out of your Mac is recorded where you can read it, and anything trying to install itself has to interrupt you first.
Your work has a home on GitHub, the website that stores projects online, and it stays private until you invite someone into it. Your site diary, the file where you record what confused you, has its first entry.
Nothing gets built today, and none of it has to happen in one sitting. Part 2 lays the ground the building stands on, and every step in it is one you will use again on every project after this.
How these
pages work.
These pages read the way Part 1 did: the same six rules live there. The reading happens here. The doing happens afterwards, in the guided session.
The guided session is Claude Code working through Part 2 with you, one step at a time, on your own Mac. You start it with a line you copy from these pages. It waits for you at every step.
Where things go.
Claude Code works on your Mac and does the building. The Ask button, bottom right of this page, opens the Ask panel, which answers questions about what you are reading. It cannot change anything on your Mac.
The paste line.
A paste line is a line of text with a copy button. Press the button, then paste it into Claude Code. Every one carries this label:
Ask about any words.
Select any words and press the button that appears. The Ask panel opens with your question already written.
If it does not match, stop.
If what you see does not match what Claude Code said you would see: stop. Tell Claude Code what is on your screen. Change nothing else until it matches.
Neither of these is a paste line. There is nothing to copy and nothing to type. Read the question, press one of the two buttons under it, and an answer appears here on the page.
Three things,
from memory.
Three words from Part 1 that Part 2 stands on. Answer out loud before you tap.
By the end of this chapter you have Claude Code open in front of you, Munim’s invitation accepted, and a way to tell whether the guided session is on this Mac or not.
To open Claude Code: press the preset, your saved button at the top of Superset, the app that lists your projects. Claude Code opens in your project folder.
He sends you an invitation to the playbook, his folder of building methods. Accept it from your email. The guided session copies that folder onto your Mac, and it cannot do that until you have accepted.
How to tell the first paste line worked. In chapter 03 you paste /workshop 2 into Claude Code. It worked if Claude Code answers by naming Part 2 and asking you a question before it does anything.
It has not worked if Claude Code replies as though you had typed an ordinary sentence, or says it does not know that name. Nothing is broken, and nothing you did caused it.
The guided session is one small file that has to be put on this Mac once, and nobody has put it there yet. Paste the line below, and Claude Code puts it there itself.
This one is written for Claude Code rather than for you, and it names folders you will never open. You are not expected to read it. Press copy, paste the whole line into Claude Code, and read what comes back.

Much of this will not
work first time.
That is the shape of this work, not a sign that you are doing it wrong. Every step is an experiment: try it, look at what came back, adjust. The people who do this for a living work the same way.
So when something does what you did not expect, nothing is broken and nothing is your fault. You have found something. Stop, and tell Claude Code what is on your screen.
This chapter gives you the one thing to do with what you find: write it down as it happens, in a file you keep.
By the end of it you know what goes in that file and what does not. You make the file itself in chapter 09.
You keep a site diary.
A site diary is one file in your project where the awkward moments get written down as they happen.
When something confuses you, blocks you, or does what you did not expect, you type two words to Claude Code: diary that. It writes the entry for you, with the date and what you were doing.
What goes in it: the moment you got stuck, the word nobody explained, the thing you wished worked differently. Every entry is about the instructions, never about you.
You make your own diary file in chapter 09, and it gets its first entry the same day. Part 5 turns those entries into changes to the method itself.
Do none of this on a work Mac. Part 2 installs software, changes settings and signs into accounts, and a work machine belongs to your employer, with their rules running on it.
If the only Mac you have is the work one, tell Munim before you start rather than working around it.
The safety check.
This comes first because everything you build will live on this Mac. A skill called /secure-machine reads what already protects it, and changes nothing.
By the end of this chapter you have read nine protections on your own Mac, one at a time, with a verdict written beside each, and you know which of them still want something from you.
You also have the safe: the one place a password or a key belongs from now on, instead of sitting in a file on your Mac.
A control is one protection on your Mac, like the lock that comes on when it sits idle. There are nine, and each one gets one of four verdicts.
PASS The protection is on, and the check saw it for itself.
FAIL The check saw that something is wrong, and there is a step to put it right.
UNKNOWN The check could not see the answer from where it stands. You look, with your own eyes.
SELF-ATTEST Nothing was checked. You said it was true, and it is written down as your word rather than as a reading.
One line starts your guided session.
It starts by copying the playbook, Munim’s folder of building methods, onto your Mac.
What you should see: a table of controls, a verdict beside each, then one thing to do.If Claude Code answers as though you had typed an ordinary sentence, or says it does not know that name, the guided session is not on this Mac yet. Munim’s note in chapter 01 carries the line that puts it there.
Four of the nine, in plain words. Which way each one reads on your Mac is what the check is for, and this page does not know.
Disk encryption Your drive is unreadable without your login.
Firewall Strangers on your network cannot reach your Mac.
System Integrity Protection Nothing may rewrite the system, including you.
Gatekeeper Every app you download is checked first.
The lock screen: does your Mac ask for your password again after sitting idle? Software update: does it install Apple’s security fixes on its own?
The check cannot see either answer from where it stands, so it says UNKNOWN and leaves them to you. The next page shows you where both live and what each one has to say.
One row can genuinely FAIL: a password sitting in a settings file as ordinary readable words, rather than scrambled.
That file is opened by the Terminal, the window where you type to Claude Code, every time it starts. Anything that can read the file can read the password.
The skill moves it somewhere safe with you. That is the one thing to do at the end of this chapter.
The two rows
that read UNKNOWN.
UNKNOWN means the check could not see the answer from where it stands. Two rows read that way on most Macs, and both are settled by you, in one app, a few presses each.
The app is System Settings, the Mac’s own settings app. Open it from the Apple menu at the top left of your screen, then type the word into the search box at the top of the left-hand column.
The search does the finding for you. You never have to know which section a setting lives in.
What it must say.
Your Mac asks for your password again immediately, or after one minute. Anything longer than that is a no.
What it must say.
Your Mac installs Apple’s security fixes on its own, without waiting to be asked. That one is switched on.
Nobody has a picture of these two rows on a Mac like yours, and Apple words them differently between versions. So the drawing gives you the way in and stops where the guessing would start.
If what you find is worded differently from the two sentences above, that is expected. Read the row out to Claude Code exactly as it appears, and let it tell you whether that setting is the right way round.
This is two messages. Send the first one exactly as it is, then type what your row says into a second one.
Then the second message, in your own words: the name of the row, and what it says, copied off your screen letter for letter.
What you should see: a plain yes or no about the row you read out, and if it is a no, what to change it to. Nothing is changed for you.UNKNOWN plus your own eyes is a finished row.
Tell Claude Code what each of the two said. It writes both down as your reading rather than as its own, which is the same difference as PASS and SELF-ATTEST from the page before.
Neither row has to end up green for this chapter to be finished. It has to end up read, by you, with the answer written down.
The safe.
The password the check found was sitting in a file as readable words. Moving it means putting it somewhere that is not a file on your Mac at all.
That somewhere is the safe: a service called Doppler, which holds secrets online behind your own account and hands one to your app only while your app is running. Its free tier covers everything in these five parts.
Nothing you build in Parts 3 to 5 needs a key of any kind. This is the habit, set up once, for the day you are given one.
Putting one in.
When you do have a key, you ask Claude Code for the line that puts it in the safe, and it writes that line for you.
Type the key and press Enter. Then type one full stop on its own line and press Enter again. The screen calls that full stop a period, and it is what sends the key.
Until you type that full stop the Terminal sits there and looks stuck. Nothing is wrong. It is waiting for the line with the full stop on it.
If a key ever goes wrongTwo things can happen to a key, and they are not the same size. One of them is an errand. The other one is a bill.
You lose the key
Nothing stops working. Your app carries on, because it reads the key out of the safe each time it runs, and the safe still has it.
What you have lost is the ability to put that key anywhere new. Most companies show a key once, on the day they make it, and never show it again.
- Sign in to the company that gave you the key and make a new one.
- Turn the old one off on that same page. Until you do, it still works.
- Put the new one in the safe, with the line above.
Somebody else gets the key
A key is not a password to your account. Nobody can read your email or open your files with it. What they can do is spend, and the bill comes to you.
Nothing on your Mac tells you it has happened. The key works for whoever is holding it, in exactly the way it works for you.
The usual way one gets out is the thing this chapter is about: written inside a line, copied into a file that anything on the Mac can read.
- Turn that key off, on the website of the company that issued it. It stops the second you do, and this is the step that stops the bill.
- Make a new one and put it in the safe.
- Tell Munim, so somebody else knows to keep an eye on it.
If that company lets you set a spending limit on your account, set one on the day you get the key. It is the cheapest protection there is.
The Terminal keeps a record of every line you type into it, in a file, as ordinary readable words. That is the same shape as the problem the safety check found on your Mac.
So a line with the key written inside it copies the key into that record on its way to the safe. The key ends up in two places, and one of them is a plain file that anything can read.
A line that names only what the key is called does not do that. The Terminal asks you for the key separately, and what you type at that question is never written into the record.
So if a line ever reaches you with a long string of letters and numbers already sitting in it, do not paste it. Ask Claude Code for the version that asks you instead. That holds no matter who sent it.
What is in that record, and who can read it
It is one ordinary file, in your own folders. Every line you have typed at the Terminal is in it, as readable words, in the order you typed them.
Who can read it: anything running under your login on this Mac, anything that copies your folders such as a backup, and anyone sitting at your Mac while it is unlocked.
Who cannot: somebody on the internet, and Munim. The file is not published anywhere. The risk is a program you let in, not a stranger reaching across.
- Turn the old key off and make a new one. That is the step that makes you safe again.
- Then ask Claude Code to take the line out of the record. That part is tidying, and it comes second.
- Tell Munim.
Two-factor is the lock.
The codes are the
spare key.
This chapter locks the account that will hold every version of your work. It is the one step in Part 2 that can shut you out for good, so it comes with a spare key.
By the end of this chapter your GitHub account no longer opens on your password alone, and the list of codes that gets you back in is on paper in front of you.
GitHub is the website that stores projects online. Two-factor authentication adds a second proof on top of your password: a six digit number that changes every thirty seconds.
The number comes from the Passwords app already on your Mac. Choose Authenticator app, not text message: GitHub marks that one Less secure. GitHub makes this compulsory on your account from 23 September 2026.

Recovery codes are a short list GitHub gives you while two-factor turns on. Each code opens your account once, without the six digit number, and then stops working.
Put them on paper, where your passport lives.
Clicked past that screen? Go to github.com/settings/security, signed in, and press View beside Recovery codes.
Lose the device that makes the six digit number, with no codes on paper, and nobody at GitHub can let you back in. That is the whole reason for the codes.
What it is like if the codes are gone too
Your work is not lost. Every file is still on your Mac, and the shared copy online is still there. What you lose is the way in to the account that holds it.
You cannot prove you are you. The six digit number is the proof, the codes are the spare proof, and there is no third one.
Nobody there can wave you through, and that is the lock working rather than failing. A door that opens for you without the proof opens for anybody else the same way.
- Put the codes on paper today, while the screen is still in front of you.
- Keep them where your passport lives, not in a folder on the Mac that makes the number.
- If you have already clicked past that screen, the panel above says how to get back to it.
Ask for the walk, and the stop.
None of these
is a fault.
The next two chapters install software, which is when your Mac starts putting warnings in front of you. Two come from the Mac itself, one from a program you install in the next chapter, and one from inside your project.
All four are drawn below as they will appear. Your screen will word them differently, and the shape is what you are learning to recognise.
By the end of this chapter you know what each of the four looks like and what to do when it appears, so none of them arrives as a surprise.
The password prompt
It reads “System Settings wants to make changes.” The Mac is asking for proof. Type your password. If it appears while you are doing nothing, press Cancel and tell Claude Code.
The app check
It reads “Apple could not verify this app is free of malware.” Nothing has run: it was stopped before it opened. Press Done, then tell Claude Code.
The install warning
It comes from BlockBlock, the third install in the next chapter. It names a program and the file that program wants to leave behind, which is the first raw file path you will have seen anywhere.
When it appears, nothing has been allowed to stay yet. Press Block and your Mac is left exactly as it was, then tell Claude Code what it said.
A block is the control working.
Your project carries a guard. It checks any software before your Mac downloads it, and stops the ones it cannot vouch for.
If it stops something, never reword the request to get it through. What you download runs on your Mac the moment it arrives. Nothing looks at it in between.
Who to ask,
before you trust it.
/guardian is your security adviser. You run it, it answers, and it is not watching in between.
By the end of this chapter you know the one shape every question to it takes, and you have somewhere to send anything that worries you rather than deciding alone.
The move is always the same: the name of the skill, and what you are worried about, in the same message. Never the name on its own.
It has nothing to look at until you tell it what you are asking about, and an answer to no question sounds exactly like an answer to yours.
Before you let anything install.
The other four, in the same shape. Each one is the skill name, then what you are worried about, in one message.
2. Something somebody sent you. A link, an email or a message. Ask /guardian whether it is safe, and paste the text in underneath, or drag a screenshot into Claude Code, before you press return.
3. A warning appeared and you do not understand it. Ask /guardian about the box on your screen and describe what you can see, or drop in a screenshot.
A screenshot is the route for the moment you cannot describe what you are looking at, which is usually the moment you most need to ask.
4. Something got blocked a moment ago. Say what happened in the same message: an app download was blocked, please look at it. It can read what the guard wrote down, and now it knows which one you mean.
5. This Mac itself. Ask /guardian to screen the security of your computer and tell you where you could improve it.
Reading the whole machine is a different skill: /secure-machine, the one from chapter 03. You do not have to remember that. Ask the question in plain words and Claude Code reaches for the right one.
Nothing is watching between the times you ask. It looks at one thing at a time, when you ask it to, and it will never come to you unasked.
Two pages go with this part, meant to be printed and kept beside the Mac, because some of these steps restart the screen you would otherwise be reading.
The messages on this page are on Card 1. The guard is on Card 2.
Tampered software means somebody got into the account of the person who publishes a piece of software, and pushed out a poisoned version under their name. It arrives looking exactly like the real thing, because in every visible way it is the real thing.
So the riskiest version of anything is the one that came out an hour ago. When one of these is found it is usually pulled fast, and waiting a week puts you on the far side of that.
Your project applies that week by itself, to the ready-made building blocks it downloads while making your app. Claude Code put the setting there when it made the project, and you never have to remember it.
The same habit is worth having for a brand new Mac app. That one is our own advice, not a check that runs.
And the one thing this connects to. There is a setting that lets Claude Code act without asking you each time. You will meet it at the end of this part.
This is the one thing it does not check. It reads what is being done, not what is inside the thing being installed.
Both of these really happened, and both pages are open to read:
The Register, 31 March 2026 → A building block downloaded about a hundred million times a week was changed to install remote-control software on the machines of everyone who took it.
BleepingComputer, 23 April 2026 → A tool published by a password manager company was tampered with for about ninety minutes, and in that window it stole the passwords and keys of the people who installed it. The point is not that they were careless.
Two free,
one paid.
None of these is needed for the app in Part 3. All three protect the Mac it will be built on, and making that Mac harder to get into is what the whole of Part 2 is for.
Two words first, because everything below rests on them.
A lookup is what your Mac does before it can open a website. You type a name, and your Mac asks a service out on the internet to turn that name into the number it actually dials.
A service that refuses to answer for a name is how a page gets stopped before it can open at all.
A connection is one app on your Mac reaching out to one place on the internet. Your Mac makes hundreds every day, and today you are shown none of them.
By the end of this chapter, lookups for names known to carry scams and malware are refused, so those pages never open on this Mac.
Every connection your Mac makes is written down where you can read it. That record answers a question you cannot answer today: what has this Mac been talking to, and which app started it.
And anything that tries to install itself in the places that survive a restart has to interrupt you first, instead of arriving quietly.
You do not go looking for these on your own. In the guided session, Claude Code opens the right page and tells you what to press. You press; it reads back what came out.
None of this has to happen in one go. Each of the three is finished on its own, and the guided session picks up wherever you stopped.
If one of them will not install, stop there and say so. Tell Claude Code exactly what your screen says, word for word. It can work with the words on your screen, and it cannot work with a guess at them.
Refuses bad lookups: NextDNS.
NextDNS is a lookup service that refuses to answer for names known to carry scams and malware, so those pages never open. It also keeps a list of every name your Mac asked for.
You can switch it on with no account at all. That temporary setting expires after seven days, with no warning, and it only ever works in the one browser you set it up in. The guided session holds you at the sign-up.
What you should see: open test.nextdns.io. It answers with technical text, not a sentence. The line that matters reads "status": "ok".Records connections: Little Snitch.
It writes down every connection leaving your Mac: which app, going where, at what time. About $59, paid once. The price is in US dollars, so your bank may charge differently.
Out of the box it stops each new connection and asks you to allow or deny it. That is not how you will run it.
The guided session picks its silent mode, which its makers recommend for new users. Nothing is blocked, nothing interrupts you, and every connection is written down for you to read when you want to.
There is a free trial first, three hours at a time, restartable as often as you like, so you can watch it running before you pay. Munim’s licence cannot be shared, so this one is a purchase of your own.
Why is this one not free?
There is a free program that records connections in much the same way. It cannot be used here, and the reason it cannot is the whole reason for the $59.
Free recorders of that kind switch NextDNS off in order to do their own job, and they have nothing of their own to put in its place.
Your Mac goes back to its ordinary lookup service, which answers for scam and malware names like any other.
Nothing tells you. NextDNS still reads as set up. The recorder still reads as running. The protection you switched on ten minutes earlier is off.
Little Snitch brings its own way of doing the lookup instead of taking that part over, and the guided session points it at your NextDNS settings. So bad names go on being refused while the connections get recorded.
Interrupts installers: BlockBlock.
There are a handful of places on a Mac where software can put itself so that it starts up again every time you restart. That is how something unwanted survives being switched off.
BlockBlock watches those places and interrupts you the moment anything new appears in one. You are shown what it is and you decide.
It comes from Objective-See, a non-profit that makes Mac security tools and gives them away. Its warning is drawn for you in chapter 05, because it is the busiest of the three you will meet.
The right-hand box is the same in both rows. The difference is the left one, and nothing on your Mac would tell you which row you were in.
Claude Code runs on the same Mac as Little Snitch, so it can read those records directly. There is no account to make, no key to hold, and nothing leaves your Mac to answer the question.
So you can ask in plain English what has been trying to leave this Mac, and get a real answer read off your own machine.
Nobody is watching between the times you ask. Claude Code answers when you ask it and not otherwise. Nothing in Part 2 sets up an alarm, and nothing here will tell you unprompted that something happened.
Little Snitch also has a window of its own called the Network Monitor, showing what is connecting right now. You open it and look. There is nothing to type.
Claude Code,
in Chrome.
Until now, when a page did not match what you were told, you described it. Now Claude Code can look at it with you.
By the end of this chapter Claude Code can see the page in front of you, on the sites you have allowed and on no others, and the list of allowed sites starts empty.
You add an extension, a small piece of software that adds a feature to Chrome. Then you sign in inside Chrome with the same account you signed into Claude Code with in Part 1. Until you do, the extension does nothing.
It can read the pages open in your browser and act on them: clicking, typing, moving from page to page.
Chrome asks you site by site, and you can take a site back whenever you like. Decide now, while you are reading this, rather than in the moment a box appears asking you.
On a site you are signed into, it sees what you see. Not the public version of the page: your version, with your account open on it. That is the whole reason Chrome asks you one site at a time instead of asking once.
A page will half work one day and you will not know why. This is the one thing in Part 2 most likely to find you weeks from now, with nobody sitting beside you, so it is here rather than left to be discovered.
NextDNS, the lookup service you set up in chapter 06, can refuse a name that a page quietly needs. Nothing shows you an error. A button spins and never finishes, or part of the page stays blank, and everything else looks normal.
You do not have to work out which name. After this chapter Claude Code can see the page with you, so you describe what has stopped and it goes looking.
Describe it, do not hunt for it.
You do not have to guess which one. Claude Code can read all three of them on this Mac, so let it look rather than deciding in advance.
Or do it yourself. Sign in at my.nextdns.io and open the Logs tab. It lists every name your Mac has asked for, newest first, with the refused ones marked.
Reload the page that broke, then look at the very top of that list. The refused name you want is the one that appears at the moment you reloaded, which saves you reading any of the rest.
Beside that name there is an option to allow it from now on. If what you see is worded differently, read it out to Claude Code rather than guessing.
The install, and the stop.
Your repository.

Your work needs a home that is not only this Mac, and Munim needs to see it without asking you. You make that here.
A repository is your project folder, plus a full record of every version and a twin on GitHub. Sending work to the twin is a push: you ask Claude Code once, and the twin catches up.
By the end of this chapter your project exists on GitHub as a private repository, Munim has an invitation into it, and five skills are sitting in your project folder.
One ask.
It stays your repository. You can take that access back at any time.
He can see how far you have got without asking you.
If what comes back has no Private badge on it, say so before you carry on. That is the one thing on this page worth stopping to put right.
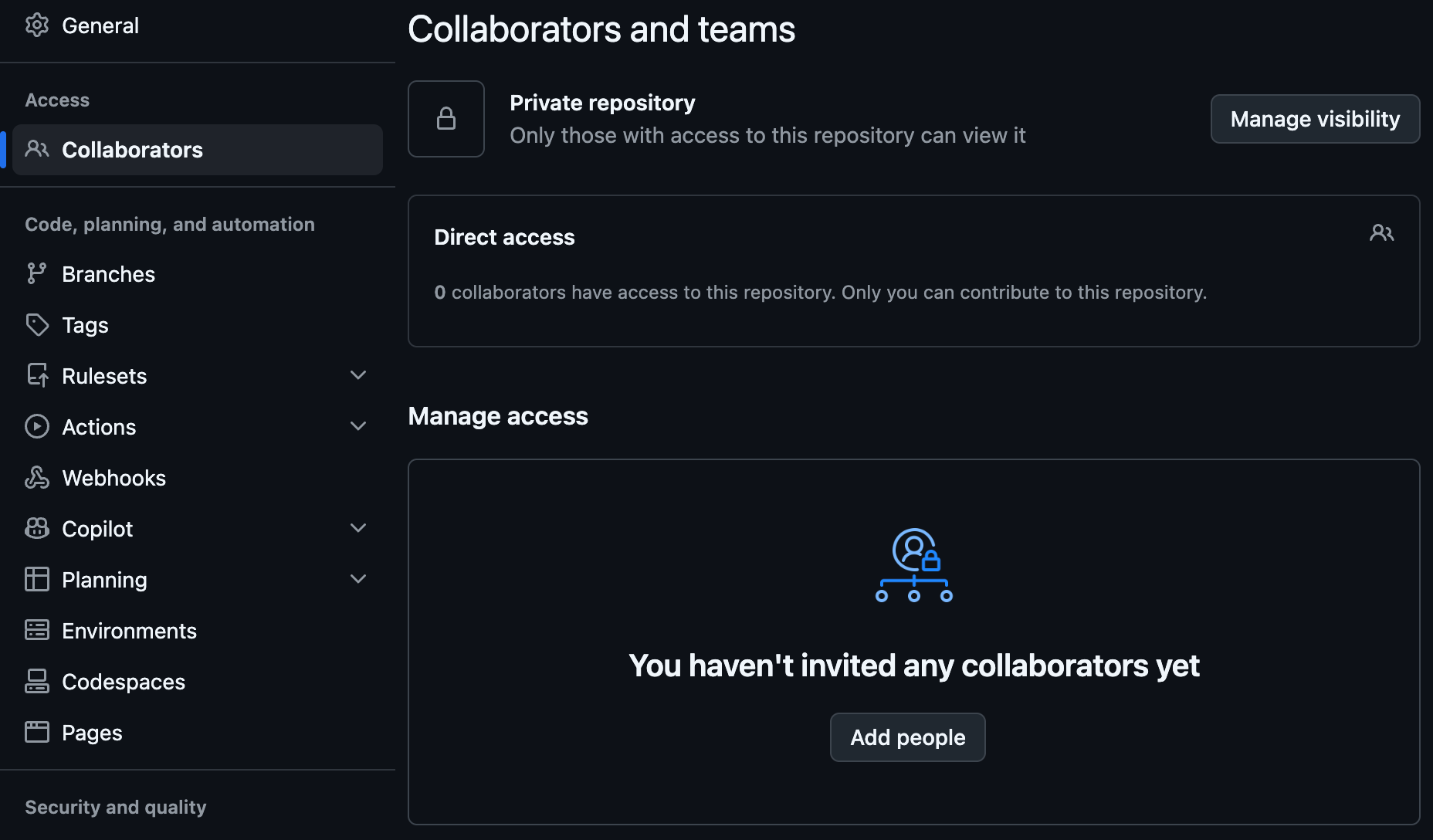
This is the page before anyone is invited. Find two things: the Private repository line at the top, and Collaborators highlighted on the left. Once Claude Code sends the invitation, Munim’s name appears in the empty panel.
The playbook is a folder of its own, and your access to it is read-only: open every page, change none.
Five skills land in your project. You have met /secure-machine and /guardian. The other three are introduced in Part 4.
Is my work on the internet now?
It is on GitHub’s computers, and it is shut. Private means it opens for you and for anybody you invite, and for nobody else. There is no link that lets a stranger in.
Munim can open it once he accepts the invitation you send here. That is one person, by name, and you can take it back at any time.
What it is not is a published website. Nothing you put in it appears in a search.
Your work has a home now. One file is still missing from it, and it is the one you write yourself: the diary chapter 02 told you about.
The diary,
made.
Chapter 02 said what it is for. Here it becomes a real file: SITE_DIARY.md in your project folder, visible in Finder. Claude Code adds an entry when you ask, and never edits one already there.
By the end of this chapter that file exists with its first entry in it, and you have said the two words that add the next one.
How an entry happens.
The nearest thing you already run.
An RFI register. The methodology is the site, you are the inspector, and every entry is raised against the playbook, never against you.
Where that comparison breaks.
An RFI blocks work until someone answers it. A diary entry blocks nothing. You raise it and carry on.
Claude Code puts one of three tags on each entry, so Part 5 can sort them into three piles: [stuck], [confusing], [wish]. You never type them yourself.
Eight to fifteen entries across the five parts is normal. Fewer than that usually means they were not written down, not that nothing happened.
WORDS.md sits beside it: one line for every name these five parts use, so a word never sends you back to a page.

Say it out loud,
instead of typing it.
Part 3 opens by asking you to describe the app you want, at length and in your own words. That is a great deal of writing, and typing is where people quietly shorten what they meant.
So you set this up today, while there is nothing else to think about. You press a key, you speak, and the words arrive as text where you were about to type.
By the end of this chapter VoiceInk is on your Mac, unlocked with the key Munim sent you, set to the two models below, and started once with a key you picked yourself.
Munim has already sent you a key that unlocks VoiceInk for good. It is not printed on this page and it is not in the guided session, because a key on a page is a key anybody can use.
Find that message before you start. If you cannot, ask him for it again on WhatsApp.
Two asks, in that order.
Chapter 05 said to ask the guard before anything new lands on your Mac. This is the next thing that lands on it.
Everything after this is in one window with a list down the left side of it. Two items on that list are all you need today.
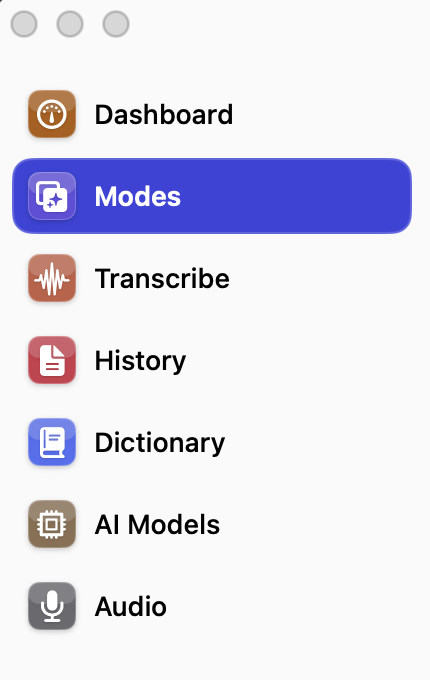
AI Models holds the first setting. Modes holds the rest. Dashboard, Transcribe, History, Dictionary and Audio can wait for another day.
Two models do two different jobs, one after the other. That is the part worth having straight before you press anything, because you set them in two different places.
Both are chosen on one sheet further down this page. The first one has to be on your Mac before it can be chosen, though, and that is what AI Models is for.
Open it, open the Model Catalog, and stay on the Local tab.
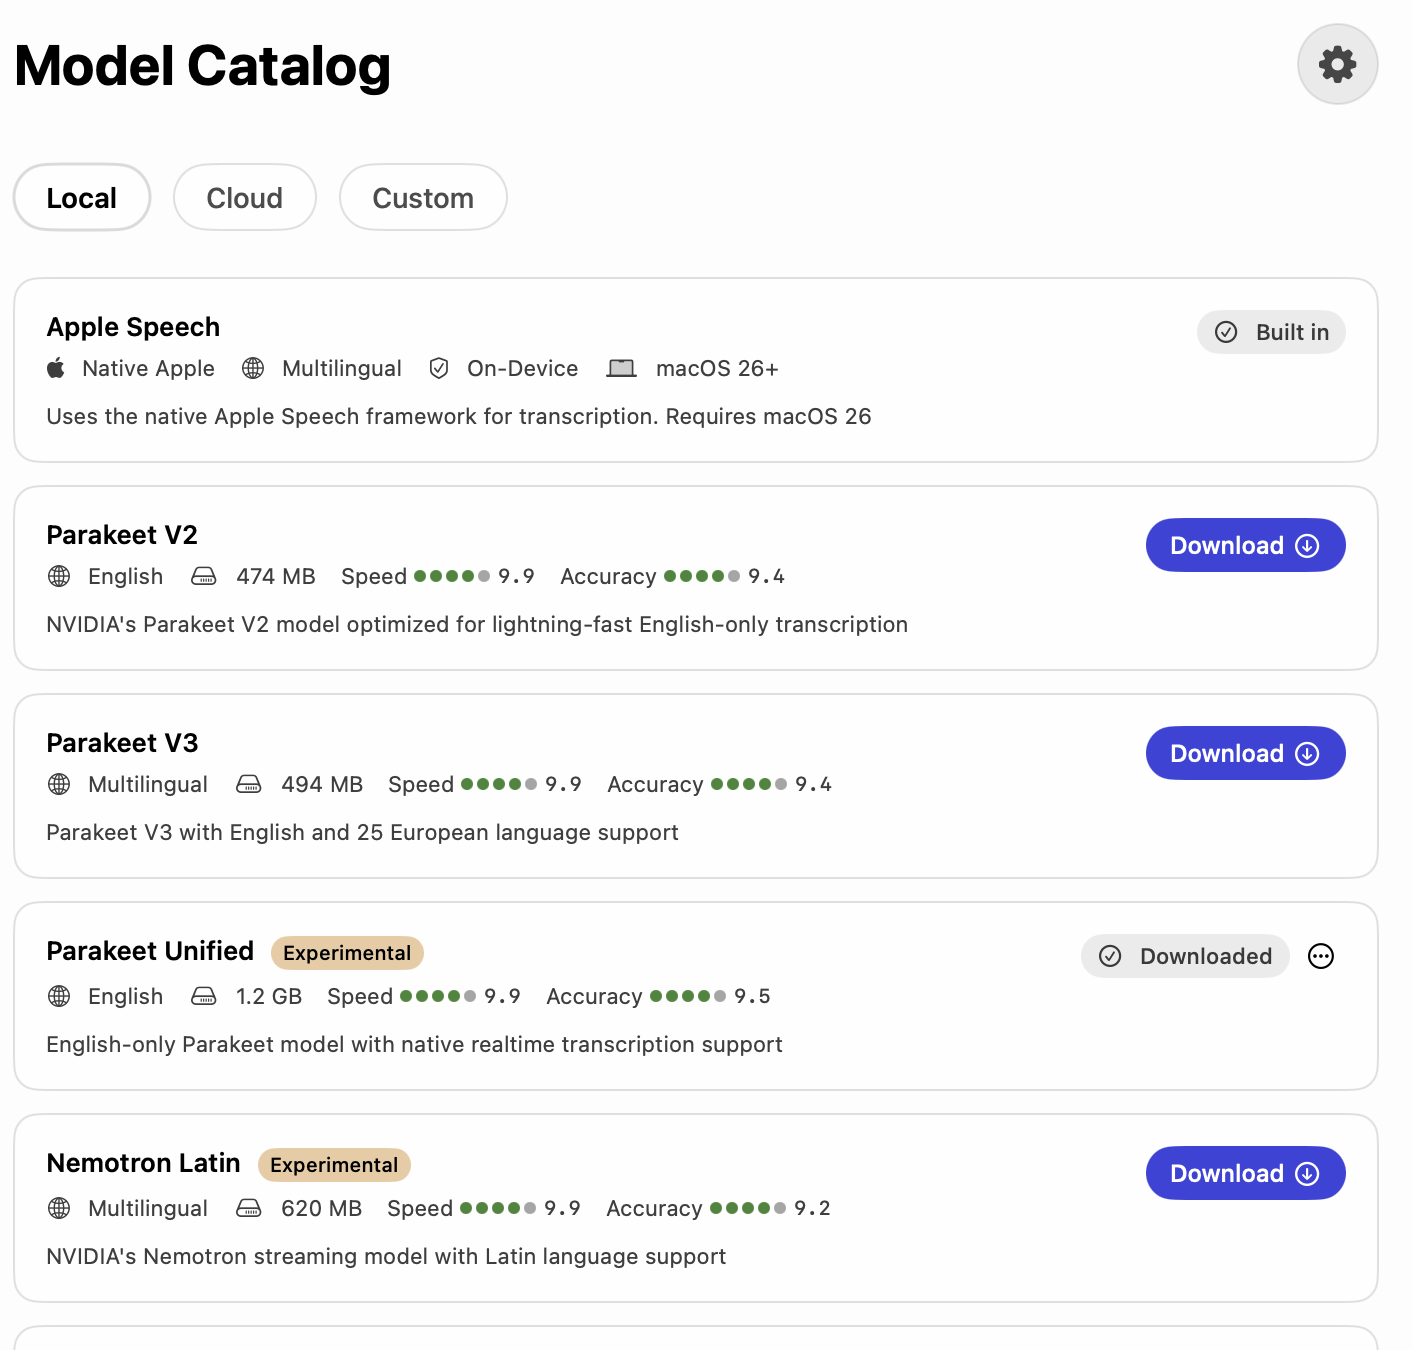
Three rows begin with the word Parakeet and only one of them is yours. Parakeet V2 and Parakeet V3 are not it, and they sit directly above the one that is.

Parakeet Unified, the row carrying the Experimental badge, English, 1.2 GB. Press Download and leave it to finish. When it has, the button on the right reads Downloaded, as it does here.
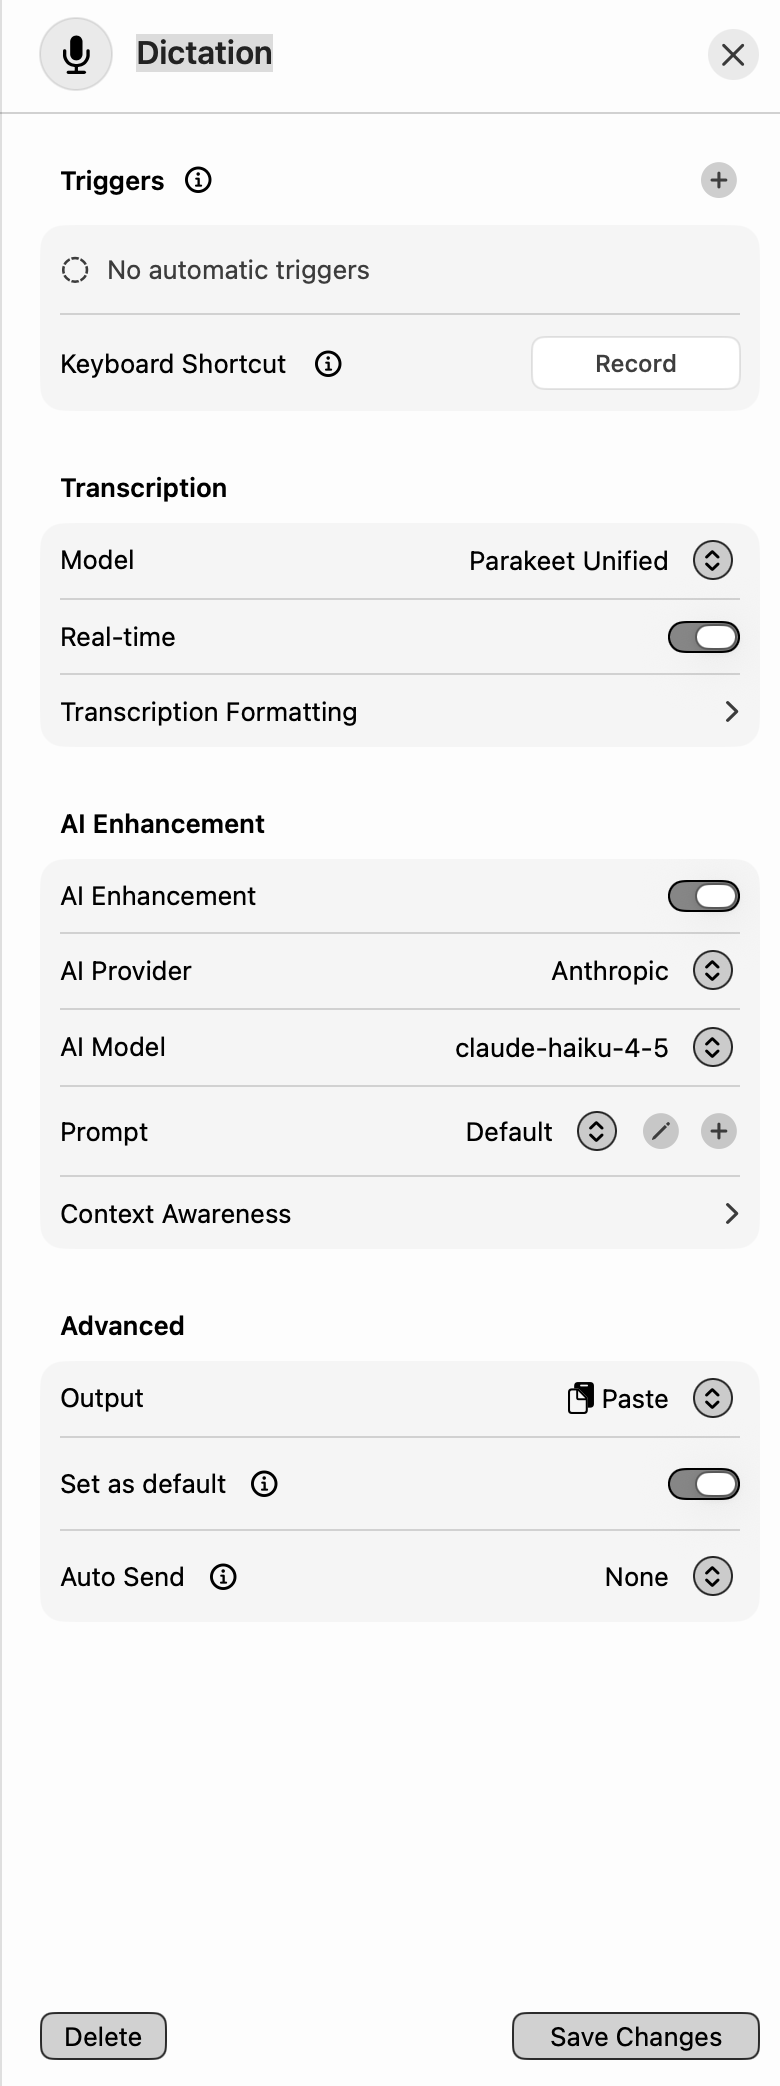
Four blocks: Triggers, Transcription, AI Enhancement, Advanced. A handful of rows in them have to say the right thing, and Save Changes at the foot is what keeps them.
Then Modes, then Dictation. That opens one long sheet. Here it is top to bottom, so you know how far it runs before you start.
Six things to set, in the order they appear on that sheet. Tick them off as you go.
Set it to Parakeet Unified, the one you downloaded. Not V2 and not V3.
Switched on.
Switched on. This is the tidying step from the drawing above, and it does nothing until you turn it on.
Set it to Anthropic.
Set it to claude-haiku-4-5. Read it letter by letter and pick the row that matches exactly.
Output set to Paste, and Set as default switched on. Then press Save Changes.
If a row on your sheet is not in that list, leave it exactly as you found it.
Last, the key that starts a dictation. You choose that one, so this page does not name one.

Press Record, then press the key you want to use. Pick one you never press by accident. Munim uses one of the function keys along the top of his keyboard, and yours does not have to be his.
Nobody on this workshop has a picture of that row with a key already in it, so there is no picture here of what it looks like afterwards. What appears there is whatever you pressed.

Press your key and this bar appears. The line in the middle moves while it can hear you, which is how you know it is working. The red button at the left stops it.
The sheet you set is on Paste, so the finished words should arrive where you were about to type, on their own.
If they do not, Munim holds Control and Command and presses V to bring them in. He told us that. There is no picture of it here, so treat it as the first thing to try rather than the only way.
The screens a brand new install shows you the first time you open it. Every picture above is of an app that has been running for months, so your first few minutes will not look like them.
Read what is actually on your screen rather than hunting for these exact words. If a row is not where these pictures put it, read it out to Claude Code and ask what it is before you press it.
It does not ask you
about everything.
Claude Code stops and asks your permission for some of what it does and not for the rest. Which is which is decided by one setting, and yours is already on the right one. This chapter is about recognising it, not about changing it.
By the end of this chapter you can find that setting at the bottom of your own window, you know the one thing it does not protect you from, and you know two words to walk away from.

The words auto mode on, in yellow. Auto mode is Claude Code getting on with the ordinary steps by itself, instead of stopping to ask you about each one.
There is nothing here for you to switch on: from 14 August 2026 this is what every new session starts in. If you can see those words, you are where you should be.
The greyed words after it are a reminder that there are other settings to cycle through. You want none of them, so leave that line alone.
If the bottom of your window says something else, read the line out to Claude Code and ask it to put you into auto mode. Do not go hunting through the settings yourself, and the rest of this page is why.
What if I press those two keys to see what happens?
Nothing happens on your Mac. That press changes what Claude Code asks you about next, and nothing else. No work is lost, and nothing runs.
The bottom line will read something other than auto mode on. That is the whole of what has changed, and it is written there for you to see.
Do not press it again to find your way back. The setting at the foot of this page is on that same cycle.
Read the bottom line out to Claude Code and ask it to put you back into auto mode. That works from wherever you have landed.
Auto mode is not yes to everything. A second, separate model reads each action before it happens and stops the ones that reach further than what you asked for.
Downloading something off the internet and running it straight away is one of the things it stops. So is sending private information out of your Mac, and so is wiping work you did before today.
The dot is the same one in both lanes. It reads the label, and never the contents.
That is the whole reason chapter 05 asked you to wait a week before taking anything new. Auto mode reads what is being done, sees an ordinary thing, and lets it through. It does not open the parcel and look inside.
The week is what stands there instead, and your project already applies it by itself. That is the connection chapter 05 promised you, and it is the whole of it.
It does still stop and ask about some things, and this is what that looks like when it happens.
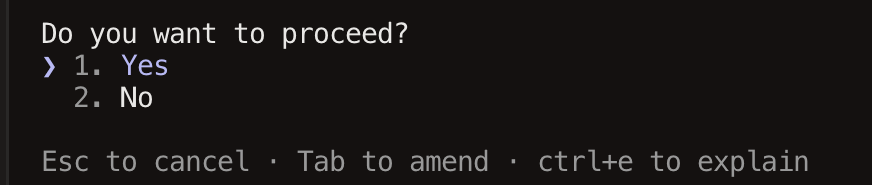
A question, two answers, and a line of other keys underneath. On the real screen there is a box above this question saying exactly what it wants to do.
That box is cut out of this picture because it named a private folder. Read it before you answer.
This is the shape chapter 05 called a gate: nothing moves until you say yes or no. The dot in the drawing above is the other shape, something reading as it goes past.
One thing worth knowing before it happens to you: if it stops three actions in a row, it stops trusting the run and starts asking you about everything again. That is the system working, not your Mac breaking.
There is one more setting past the one you are on, and it is called bypass permissions. That one really does mean yes to everything: no reading, no stopping, no question.
Its makers say to use it only on a machine holding nothing you would mind losing. Yours holds your project and your accounts.
If you ever see those two words on your screen, you have gone one setting too far. Go back.
You will not do this
in one sitting.
Nobody does. Your work lives in the folder on your Mac, not in the chat, so closing the chat loses none of it.
By the end of this chapter you know the two lines that get you moving again on any later day, and where each of them goes.
The first picks Part 2 back up wherever you stopped. The second starts a project of your own, from nothing.
Both are on this page below, in full, each with a copy button. Neither is worth memorising: if you cannot find them again, ask Claude Code in plain words for the line that picks the workshop back up, and it will know what you mean.
Coming back is two moves. Press the preset on your project, then paste the line below. A new chat does not remember the last one, so it reads your project and tells you where you stopped.
Where was I?
The playbook on your Mac is a folder of methods. You never open it yourself. You point Claude Code at it, and it does the setting up by asking you questions.
End of Part 2.

Five things are true, and you watched the evidence for four of them.
01 Your machine’s protections were read, control by control, and you saw every verdict.
02 Your GitHub account has a second lock, and you have said the spare key is on paper.
03 Your Mac refuses scam and malware pages, and interrupts anything trying to install itself. If you took the paid one, everything leaving your Mac is recorded too.
04 Your repository exists, it is private, and it holds five skills that can read the playbook.
05 Your site diary has its first entry.
That is the ground. Part 3 builds an app on it in a single ask, and each of those five is something you would otherwise have stopped to fix later.
None of this makes you unhackable, and nothing here claims it does. It makes the likely attacks expensive.
Your one next action
Type diary that to Claude Code, for the one thing on these pages you had to read twice.
Next
Part 3: The Quick Build
You build the whole app by asking once, after writing down what good looks like.
Open Part 3 →Anything on these pages
Send this straight to Munim. He gets it on his phone right away.