The proper
build.
In Part 3 you asked once and got an app for moving house. This part builds that same app again, in a folder of its own, in three small pieces.
What is a pack? One small job: small enough to finish in one sitting, and clear enough that you can look at the screen and say it is done. This part is three of them.
By the end you will have written down what the app must do, built it in three packs, checked each pack against that writing, saved every step where Munim can read it, and built the last pack with nobody handing you the words.
That is the difference between an app you were given and an app you can keep changing.
Three things,
before you
start.
Nothing here is new. Everything in this part stands on these three, so check them first. Say your answer out loud before you tap a card.
When this chapter ends you know which of the three you still have. If what you said and what the card says do not match, open the link on that card, read that page again, and come back here.
First you make
the project.
Nothing exists yet. Before you can build anything there has to be somewhere to build it: a new folder on your Mac with the playbook’s starting pieces already inside it.
You make that folder, it takes one sentence, and this chapter is that sentence. When the chapter ends you have the folder, you know what is inside it, and you can reach it again from Superset on any morning you come back.
To open Claude Code: press the preset, your saved button at the top of Superset, the app that lists your projects. It opens your quick build from Part 3, which is the only project you have.
A paste line is a line of text with a copy button. Press the button, then paste the line into Claude Code. Copy the one below and paste it in.
That one sentence makes six things, and you do not have to remember any of them. This is so you recognise them when you meet them.
Two of the five skills you have already used, /secure-machine and /guardian. Chapter 07 is the other three.
The three checks run by themselves, in the background, from now on. Nobody starts them and you cannot forget them. Chapter 04 draws all three and says what each one stops.
The week-old rule is the one you met in Part 2, written into the folder itself: nothing published in the last seven days gets installed here.
What the week-old rule is keeping out
Software you install is written by strangers and updated constantly. Now and then somebody breaks into one of those updates and puts something of their own inside it.
It tends to be found within a day or two, because thousands of people install it at once and one of them notices. The harm lands on whoever installed it first.
The rule takes your project out of that first day. Nothing published in the last seven days is installed here, so you are never the one who finds out.
- Nothing. It is written into the folder, it runs on its own, and it holds on the day you have forgotten it is there.
- If something you need is newer than a week, say so to Claude Code and it will tell you what waiting costs you.
There is no CLAUDE.md in that folder, and that is correct. It is the file Claude Code reads first in any project, and an empty folder has nothing to tell it yet.
It gets written later in this same session, after you have said what you are building. Nothing in it is yours to type from memory.
The folder is on your Mac now. Superset does not know about it yet, so it is not in your list of projects and pressing the preset will not open it.
What you are looking for in Superset is the choice that takes a folder you already have and adds it to that list. Different versions word it differently, so read what is on your own screen rather than hunting for a particular word.
If nothing on the screen matches, type out what you can see and ask Claude Code which one to press.
What you should see: the new name in your list of projects in Superset, beside your quick build, ending in -proper.From here on you have two projects with almost the same name. Work in the wrong one and nothing warns you: Claude Code will do exactly what you asked, in the wrong folder.
Why the quick one
came out rough.
In Part 3 you built an app for moving house. You described the whole thing to Claude Code in one go, in one or two messages, and took what came back.
It came out rough. Some of the lines on your list passed and some did not, and you wrote the score down.
Here is why, and it is not your wording. You could have described that app perfectly and it would still have come out rough, because everything arrived at once.
When this chapter ends you can say why the quick build came out rough without blaming your own words, and you know which three things this part puts in order.
Three things go wrong when work arrives all at once.
What “done” means gets decided after the app already exists, so it bends to fit what you were shown.
Everything is built in one go, so nothing can be checked before the next thing lands on top of it.
And the second change breaks the first, because nothing was holding the first in place.
Part 3 gave you the middle one. Part 4 puts all three in order, and the drawing below is that order. You walk it three times, once for each pack.
The double bar on the drawing is a gate: a check that runs before a step and stops it when something that step needs is missing. This one is not optional, and chapter 07 says what it checks.
Skip it and the plan gets written on decisions nobody made. Pack two then makes those decisions differently, and the two disagree inside one app. That is the third fault above, arriving again.
In the folder you made on chapter 02, not your quick build. Chapter 10 starts the guided session, the sitting where Claude Code walks you through the doing. Read to the end before you paste anything.
A skill is a named shortcut: type a slash and its name, and a written procedure runs. Here is the one that answers “where am I”. Copy the line below and paste it into Claude Code.
The whole run,
on one drawing.
Chapter 03 drew six stops and named them: SPEC, PACK, CRITERIA, PLAN, BUILD, REVIEW. This is that run with the names you will see on your screen, in the order you meet them, from the folder you made to the end of a sitting.
When this chapter ends you can point at any line of it and say what that step is for, and you know what is running in the background behind all of it.
Nothing here is to be memorised. It is here so that when a name appears on your screen you know where you are.
The three checks from chapter 02 are not on that drawing, because they are not steps. They run in the background from the moment the folder exists, and each one stops exactly one thing.
You will only ever notice one when it stops you, and it prints its own name when it does. Here are the three names you might see, and what each is for.
It screens what you type, not what you click.
It stops software being installed, a file fetched from the internet being run, things outside this project being deleted, or saved work being thrown away, whenever that arrives as something typed.
It cannot see what you install by clicking: a browser add-on, a downloaded installer, an app store. Those you check yourself, and nothing stopping you is not the same as something having checked.
To get past it: ask /guardian about the thing that was stopped, in the same message. Read what it tells you, then say whether it goes ahead.
No skipping the checks.
It stops a save that would skip this project’s own checks. If one of those checks is wrong, the check gets fixed. It does not get switched off.
The old proofs stay.
A test is a small check that runs by itself and says whether one piece of the app still works. This stops an existing one being edited. Writing new ones is always allowed.
What a skipped check would let through
The checks read your work before it is saved and say whether it still holds together. Skipping them saves a few seconds.
What gets through is a save nobody read. It looks finished, it goes up to the shared copy, and the fault inside it is now part of what your next pack is built on.
The expensive part is not the fault. It is that the record says this work passed, so nobody looks there again, and the next person trusting it is you in a fortnight.
- Ask Claude Code to say, in plain words, what the check is objecting to.
- If the check is wrong, the check gets fixed. That is a change to the check, and it is allowed.
- If you still disagree, tell Munim. Do not ask for the version that goes around it.
All three are files inside your project, so they hold for anyone who opens it, and they hold on the day you forget about them.
What “the design step” opens intoOne row on the drawing above holds four steps. You will see all four names on your screen, so here they are in the order they run.
/design-platform
Which tool draws it. Four to choose from. Two are outside tools, Google Stitch and Figma. The other two are Claude Code drawing the screens for you, or writing the look straight into the app.
Claude Code lists them and asks which. You pick once, and the rest of the build follows that choice.
/screen-inventory
The list of screens your app needs. Written down before any of them exist, the same way your list of what good looks like was.
/screen-inventory --flow
Those same screens drawn, with arrows. It shows which screen leads to which, so a screen nothing reaches is visible before it is built.
/design-check
A gate. It blocks a pack that changes what the app looks like until the look has been settled.
What happens if the design step is skipped
Every pack picks the look again, from nothing. Three unrelated products were built this way with no shared design step. All three landed on the same background colour, and two of them on the identical accent, without anyone choosing it.
Nothing goes wrong while it is happening. It shows up as an app whose screens do not look like each other, which is the hardest kind of fault to name and the most expensive to undo.
- A pack that changes the look is blocked while there is no list of screens.
- The same pack is blocked again if the look has not been checked. Getting past the first one does not get you past the second, so meeting the second is not a sign the first was fixed wrongly.
Write it down
before you
build it.
First stop on the drawing: deciding what you are building, before anyone builds it.
The spec says what you are building, who uses it, and what it must do. It lives in your project folder as SPECS.md, and Claude Code reads it every session.
When this stop is done you have one file you can read in plain English, and every pack after it is built from that file.
If it writes a whole spec instead of asking, paste this.
Two things /spec-writer will not ask about. It asks good questions and it cannot ask about what it does not know you want, so these two are yours to raise.
The numbers.
Each box gets a number written on it with a marker. How many digits, and can a number be used again after a box is emptied? Say the rule while it interviews you, or Claude Code picks one for you.
The boxes survive the update.
You add three boxes, the app is changed and started again, and the three boxes are still there. Nobody thinks to say so out loud, so you say it.
A pack is one
small piece of work.
Second stop on the drawing, and the one this whole part rests on. A pack is one small job: small enough to finish in one sitting, and clear enough that you can look at the screen and say whether it is done.
Your app is three packs. Here they are, in the order you build them. You finish one before you start the next.

Make a box and see it.
Add a box, get a number for it, write that number on the real box. It appears in your list.
Open a box, list what is in it.
Type the number, land on that box, add things by typing. Close the app, open it again, still there.
Find the kettle.
Type kettle and see every box that has one in it.
The help you are handed shrinks as you go, and that is planned from the start. The drawing below is the whole of it.
A pack closes against its acceptance criteria: the lines that say what must be true before it is finished. You are done when every line is true on your screen, and not before.
Pack 1’s lines read like this: I add a box, the app gives it a number, and that box appears in my list. Every word of that can be checked by looking.
A line you cannot check by looking at the screen is a wish. “The list feels fast” is a wish. “The box appears in the list without me restarting the app” is a line.
A skill is a
method statement.
Five skills landed in your new project when you made it on chapter 02. You have used two of them, /secure-machine and /guardian, back in Part 2. This chapter is the other three, and the check most likely to stop you today.
When this chapter ends you can name what each of your five skills does, and you know the one move that gets you past a check that has stopped you.
Where it holds.
A named procedure. Written once, the same every time, for whoever is on site.
Where it breaks.
A method statement assumes a human reading it with judgment. A skill is followed literally: what it does not say, it does not do.
/spec-writer interviews you and writes the spec. /bootstrap-project turns your new folder into a project and copies the rest of the playbook’s skills into it. /implementation-guide names the step you are standing on.
You run the middle one once, at the start. The other two you use all day.
You met a gate on chapter 03: the double bar across the drawing. This is the one that sits there, and the drawing below is what it actually does, in four steps.
It reads every document your pack leans on and lifts out every question nobody answered. The dangerous ones are the questions nobody marked as open: a line reading “roughly fifty boxes” looks settled and is not, because nothing can be built against “roughly”.
It runs before every pack and it is not optional. Ask the planning step, /feature-plan, for a plan before the gate has run, and it stops and tells you to run the gate first.
When it stops it prints a long name. Paste back exactly what it printed. You never have to type that name and you never have to read it.
One word of it is worth knowing, because it is your own. Architectural here means the shape of the software, not buildings.
Neither the gate nor the planning step is one of your five. Both arrive when /bootstrap-project runs.
Every save is
a revision.
Pack one works. This chapter is the one thing you do between packs, and it takes one line. When it ends you have a copy of pack one that nothing you do afterwards can lose.
Ask for a commit and your project keeps a numbered, dated copy of itself, exactly as it stands. That copy holds pack one in place while pack two goes in.
Do it every time a pack works. If pack two goes wrong you can ask for pack one back, as it was, and lose nothing you had finished.
Where it holds.
Numbered and dated, like a revision on a drawing set. You can always fetch an older copy back.
Where it breaks.
Drawings supersede: Rev C replaces Rev B. Saves never replace each other. They pile up, and the work can run two ways at once and be joined back later.
He reads what
you finished.
Those saves are also how the two of you work together, and nothing so far has said how. When this chapter ends you know what Munim sees of your work, and when.
Your saves sit on your Mac until you ask Claude Code to send them up. Then they land on the shared copy of your project kept on the internet, on GitHub. That copy is the one Munim can open.
The seven steps below follow one pull request, a proposal Munim can read and question. One word before you start: merge means join in, and step 6 is where that happens.
-
1 The same app, in three places.
The app exists in three places at once. A copy on your Mac, a copy on Munim’s, and one in the middle called main. Main is the one that counts: it is what the app is.
-
2 You work. Your copy moves ahead.
You build a pack and save it three times. Those saves are on your Mac and nowhere else. Main has not changed and Munim’s copy has not changed. Nothing has left your desk yet.
-
3 You send it up. It lands beside main, not in it.
You ask Claude Code to send it up. Your saves land in the shared copy, in a place of their own beside main. Main is untouched. Nothing you send can change the app by itself.
-
4 The proposal has a page. The page is the pull request.
A pull request is that proposal with a page attached. Your title at the top, your saves, and every line you changed with the version that was there before it.
Drawn from GitHub’s own pages. Your screen may differ, and the button Munim presses is not drawn: it only appears for somebody who can join work in, so nobody here has seen it.
-
5 His Mac reads the page.
He opens that page on his own Mac. He sees the title, your saves and the changed lines. He does not see your Mac, your chat, or a pack you have not sent up.
-
6 He decides. There are two ways out.
This is the part a straight line cannot show. He can join it in, or he can write back on a line and ask. If he asks, nothing joins in: you change it, and the same page updates.
A question is not a mark against you. It is the ordinary way round this loop, and most pull requests go round it at least once.
-
7 Joined in. Then you both bring it down.
Main now holds your work and the proposal is finished. Each of you brings main down to your own Mac, and the three copies match again. That is one turn, and the next pack starts it over.
What Munim sees: a page on GitHub with your title at the top, the list of your saves, and every changed line. He does not see your Mac, your chat, or the packs you have not sent.
When he sees it: after you send a finished pack up, not while you are working. Nothing arrives when you save, so a pack you are halfway through is nobody’s business but yours.
He is not watching you work. He is reading what you finished.
You do not set any of this up on your own, and there is nothing here to type from memory. The guided session does it with you the first time.
After that you ask for it in the same plain words you asked for a commit.
The rest of
today is in
Claude Code.
This chapter is the handover, where these pages stop and the doing moves into Claude Code. Here is what you say to start, and what you say to come back.
Chapter 11 needs Xcode, the kit Apple makes for building iPhone apps, on your Mac. It is a big download. Ask Claude Code to start it now, while you read on.
Three things about it are worth knowing before you begin, and the first one is the one that can waste an evening.
Version 26. Not 27.
Xcode 27 breaks the fake phone that chapter 11 depends on. If what arrives is 27, say so to Claude Code before you go further.
2.4 GB, and it needs room.
That is the download itself. The iPhone part of it comes separately and Apple does not publish its size, so do not attempt this on a nearly full Mac.
Your Mac has to be new enough.
It needs macOS 26.2 or later and an Apple chip. Yours has both. Claude Code can check before the download starts, and it is one sentence to ask.
The first time you open it, it may ask which kinds of app you are building. Tick iOS and nothing else. That is the iPhone part, and it is the only part you need.
Copy the line below and paste it into Claude Code. It starts the guided session for Part 4.
From here it is one instruction at a time, and the help shrinks as you go, exactly as chapter 06 drew it. Chapter 14 is the pack where the last of it goes.
That is planned. Nothing is taken away from you early.
Say two words, diary that, and Claude Code writes an entry in your site diary for you: the running note you started in Part 2 of everything that got in your way. Use those two words on anything that confuses or annoys you.
Whatever you type after those two words is context for the entry, not a second instruction. Copy the line below and paste it into Claude Code.
You will not finish Part 4 in one sitting, and nothing here expects you to. Close the window when you stop. Your saves hold the work.
To come back: press the preset, then copy the line below and paste it into Claude Code. Paste it any time you are lost, not only when you come back.
If you are not sure which folder Claude Code is in, ask it and read the name back. It ends in -proper.
A fake iPhone,
on your Mac.
Your first pack is built and now somebody has to look at it. In Part 3 you looked on your own phone. Today Claude Code looks as well, and for that it needs a phone of its own.
When this chapter ends there is a second window open beside the chat with your app running in it, and Claude Code can check its own work instead of asking you whether it looks right.
The Simulator is that fake iPhone: your real app, running in a window on your Mac, and you tap it with the mouse. It is not a picture of a phone.
That is the whole reason it is worth the trouble. Claude Code can watch the app move, measure the spacing, and tell you that something sits too close to an edge, without asking you anything.
The fake iPhone lives inside Xcode, the Apple download you started on chapter 10. It is not the whole of Xcode, it is one part of it, and that part arrives separately.
So the pane can open and say no simulators were found. That is not broken. It means Xcode is here and the iPhone part is not yet, and the pane itself lists the steps and ticks them off as you do them.
This is the one part of Part 4 where two windows have to be side by side: the chat in one, the fake iPhone in the other, both where you can see them without hunting.
Put them beside each other before you start. When Claude Code changes something, the change appears in that window while you are watching it.
When your pack is built, Claude Code will offer to walk the app on its own. Say yes. It taps through screen after screen and reports what passed and what did not.
If it cannot drive the fake phone itself, it says so and walks you through it instead, telling you what to tap. Either way you are not hunting for a command.
One honest limit. It reads what is on the screen. It cannot tell you whether the app is pleasant to use, and that judgement stays yours for the whole of this build.
Claude Code,
in a window.
Everything so far has happened in a window of typed text. There is a second way to run Claude Code on your Mac, with menus and buttons, and it is called Claude Code Desktop.
It is the same Claude Code doing the same work. The reason you open it today is that the fake iPhone from chapter 11 appears inside it and nowhere else.
When this chapter ends you can point it at your project, recognise every control along the bottom, and know where to look when something needs changing.
Everything you need is on one strip along the bottom of the window. Here it is, from a real screen.
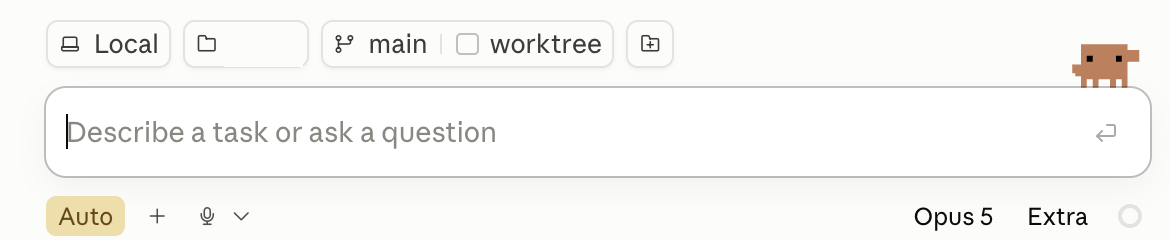
Left to right: where the work runs, which folder, which line of work, then the box you type in. Along the bottom: the mode, and which model is doing the thinking.
The first button asks where the work happens. Yours stays on Local, which means on this Mac. The others send the work somewhere else, and the fake phone cannot be reached from there.
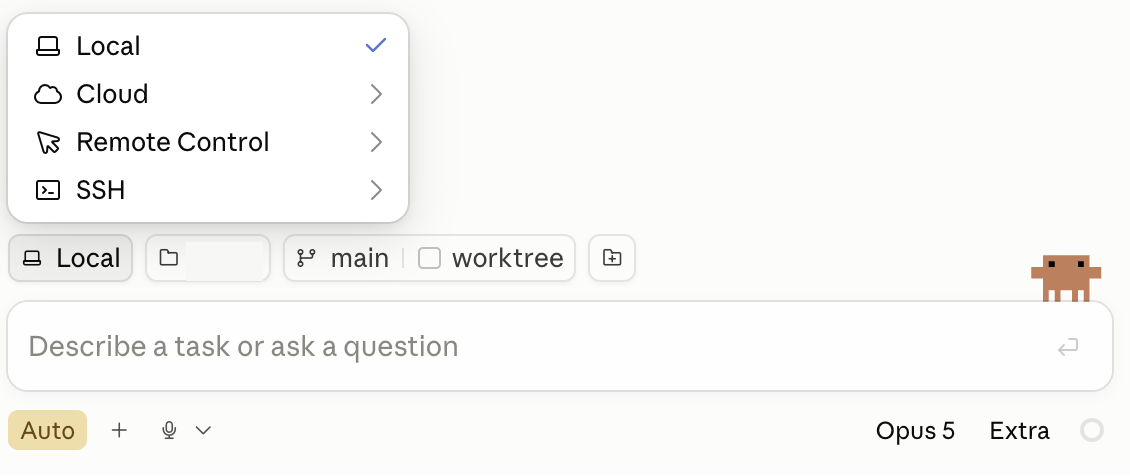
Local is ticked. Leave it there.
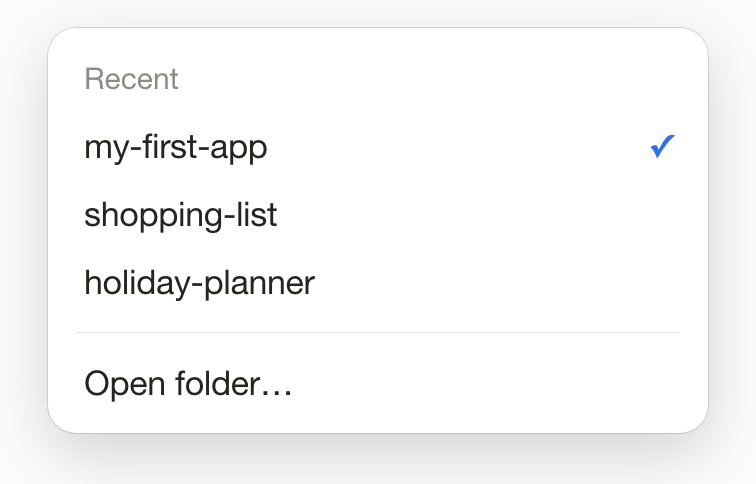
The second button. Your folder will not be in the Recent list the first time, so press Open folder and find the one ending in -proper.
Two controls sit at the right hand end, and neither one needs changing today. They are here so you recognise them rather than so you set them.
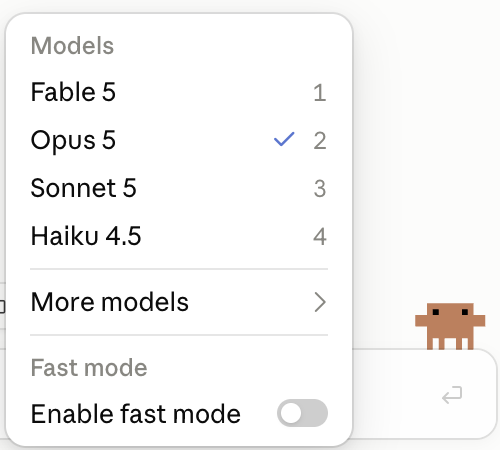
One is already ticked and it is the right one. If somebody ever asks you which model you are on, this menu is the answer.
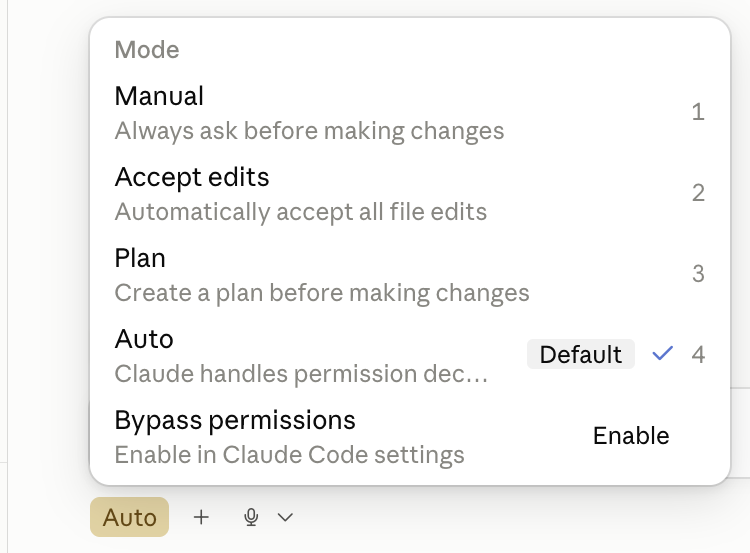
Auto already has a tick and the word Default beside it. Nothing to do. It is the yellow button on the strip.
That yellow button has a twin in the typed window, and it does not look anything like it. Same setting, different place, so here is what it looks like there.

No menu here. It is a line of text at the bottom, and the words auto mode on are in yellow. You do not have to switch it on. It arrives on.
Two more things live in menus rather than on the strip, and both are worth knowing where to find before you need them.
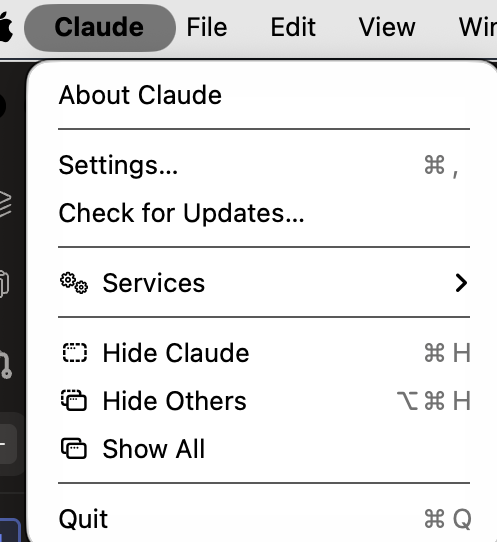
The first menu at the top left of your screen, beside the Apple symbol. Check for Updates, then let it restart. It is not in the File menu, so do not go looking for it there.
And connectors, which let it reach into things you already use, like your calendar or your files. You need none of them today. This is only where they live.
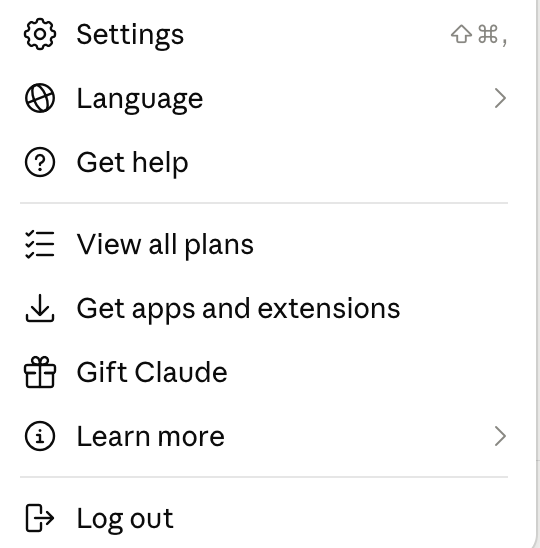
The row at the foot of the sidebar opens this. Settings is the first item.
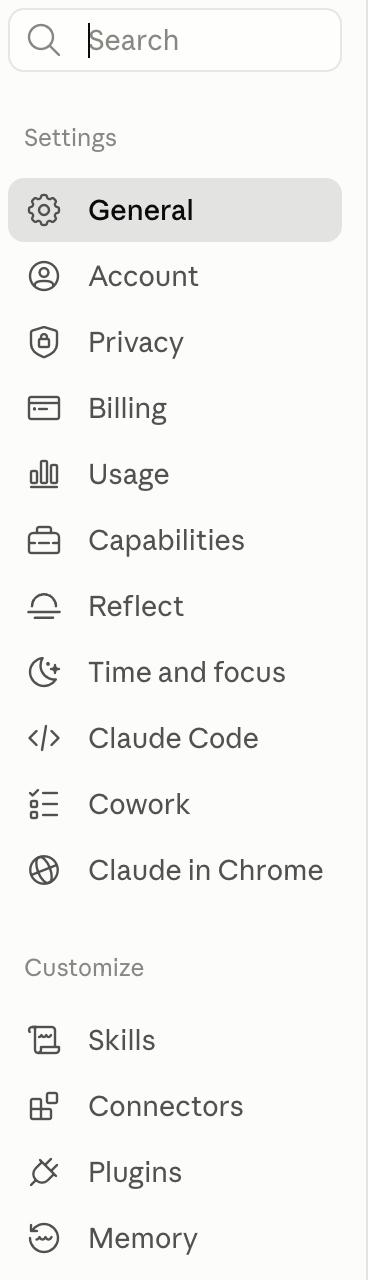
There are two groups. Connectors is in the second one, under Customize, not in the first one under Settings.
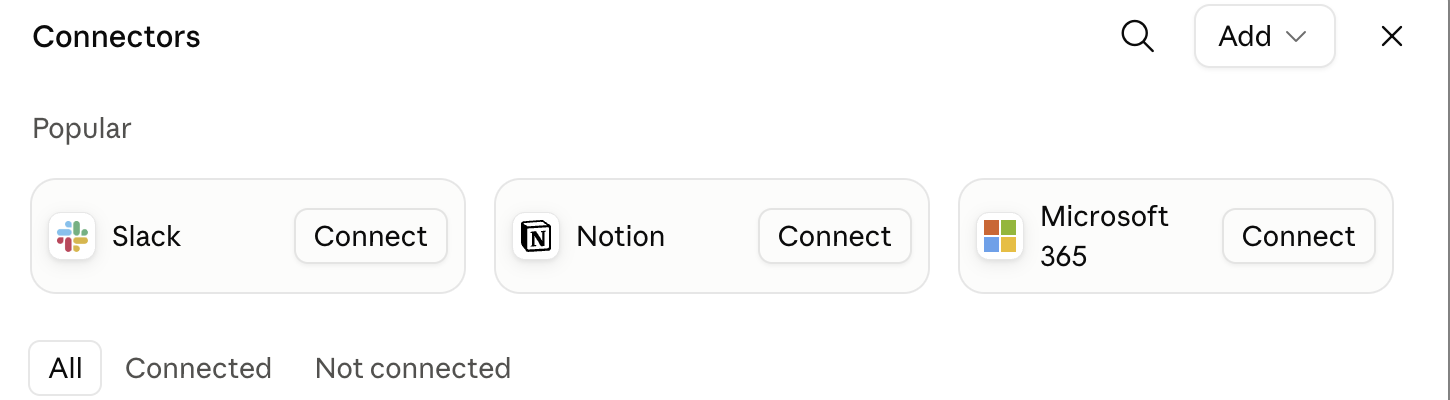
Add nothing yet. Every connector you add is one more thing that can go wrong while you are still learning what normal looks like.
Now the fake phone, and the honest part of this chapter.
There is no button that opens it and no setting that turns it on. You point Claude Code Desktop at your folder, ask it in plain words to run your app, and the phone appears beside the conversation on its own.
If you want to open one by hand afterwards, it is in the Views menu, which only lists it once a phone has been attached to that conversation.
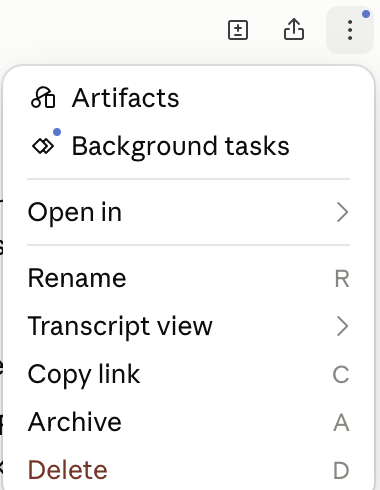
This is the three dots at the top right of a conversation. It is published here so you can stop looking: the phone is not in it, and it was never meant to be.
That is the one screen this workshop cannot show you, because nobody here has watched it. What you are aiming at is your own app running in the right hand half, which you can tap with the mouse.
The first time it uses a phone it asks your permission, once for that phone. Say yes. If you say no, the phone still works for your own taps and you can turn its access on later.
And in Anthropic’s own words: pictures of that phone are sent to them and kept with the rest of the conversation, so do not sign in to a real account on a phone it is using.
For the app you are building there is nothing to sign in to, so this one costs you nothing today. It is worth knowing before the day it does.
One last thing, and it is the one that can waste an evening: this half of the window needs the Xcode from chapter 10 to be version 26. Version 27 replaces the phone with something else and it does not work here.
Four checks.
One paste line.
Your first pack is built. Before you save it and send it up, it gets checked.
A review pass is Claude Code reading your finished pack back with one narrow question in mind. It is software reading code, not a person reading you. Four passes run, one after another, each with its own question.
A second read of the code
Reads for work written twice, work nothing uses, and errors swallowed in silence.
It needs a plugin: an extra add-on, written by somebody else, that a project can be given. The playbook installs none, so you may not have it. Claude Code says so if it is missing, and the other three still run.
The spec check
The built thing held against your written spec, and against your own list of what must be true.
The security review
Locked doors stay locked, and no secret keys are left in files.
The scope audit
Only the files you meant to change were changed. It runs last, after the other three are done.
You decide what to fix. Anything that breaks the app or breaks one of the lines on your list gets fixed before the pack is finished. Taste can wait, and some of it you will never do.
All four can pass while the app looks wrong on your screen. That is normal. They read the code. You read the app.
When the list is clear, do what chapters 08 and 09 described: ask for a commit, then send the pack up for Munim to read.
Three packs.
The third one is
yours alone.
Last chapter. Two packs are done with the words handed to you. For the third one nobody hands you anything, and that was the plan from the first page.
Everything in the third pack is something you have already done twice: check the lines that prove it works, run the gate, ask for the plan, build, review, commit.
What is taken away: the lines to paste. What still carries you: your spec, your own list of what must be true, every block that names what it wants, and the four checks. That is not scaffolding. It is the building.
If you do not know what comes next, paste /implementation-guide. It names the step you are standing on and one thing to do next. It is the same line you used to come back on chapter 10.
Solo is not silent either. The Ask button, bottom right of this page, sends a question straight to Munim, and he gets it on his phone right away.
Three lines before, one after.
That number is not a failure. Each one names a place where the playbook does not carry you alone.
Three times.
The last one alone.
Three packs, and each one went the same way: written down first, built, checked, saved, and seen working on your phone. The last one with nobody handing you the words.
You can now take an idea, say what finished means before you start, cut it into pieces, and build one piece at a time.
None of that changes when the app gets bigger. It is the same method on a bigger drawing.
What you have now
Two apps that both run on your phone: your quick build from Part 3, and the proper one you built today. Three packs, saved step by step, where Munim can read them.
And the one that outlives them
A record of every place the playbook let you down, not where you fell short.
Part 5 puts four apps side by side: the two you built, and the two Munim built from the same idea. Ask him to show you his two before you open Part 5.
Your one next action
Read your site diary end to end. Part 5 turns those entries into changes Munim makes to the playbook.
End of Part 4
Anything on these pages
Send this straight to Munim. He gets it on his phone right away.